Installation
In this article:
Requirements
- For general information on system requirements see Requirements.
- Microsoft Active Directory Service Account for accessing SIM SQL DB (in this article
sim-svc-sql)
Important
Please install all requirements before beginning with this guide!
IIS Features
Execute the following command to enable IIS features on the application server:
CMD.EXE /C DISM.EXE /enable-feature /all /online /featureName:IIS-WebServerRole /featureName:IIS-WebServer /featureName:IIS-CommonHttpFeatures /featureName:IIS-StaticContent /featureName:IIS-DefaultDocument /featureName:IIS-DirectoryBrowsing /featureName:IIS-HttpErrors /featureName:IIS-HttpRedirect /featureName:IIS-ApplicationDevelopment /featureName:IIS-ASPNET /featureName:IIS-NetFxExtensibility /featureName:IIS-ASPNET45 /featureName:IIS-NetFxExtensibility45 /featureName:IIS-ASP /featureName:IIS-CGI /featureName:IIS-ISAPIExtensions /featureName:IIS-ISAPIFilter /featureName:IIS-ServerSideIncludes /featureName:IIS-HealthAndDiagnostics /featureName:IIS-HttpLogging /featureName:IIS-LoggingLibraries /featureName:IIS-RequestMonitor /featureName:IIS-HttpTracing /featureName:IIS-CustomLogging /featureName:IIS-ODBCLogging /featureName:IIS-Security /featureName:IIS-BasicAuthentication /featureName:IIS-WindowsAuthentication /featureName:IIS-DigestAuthentication /featureName:IIS-ClientCertificateMappingAuthentication /featureName:IIS-IISCertificateMappingAuthentication /featureName:IIS-URLAuthorization /featureName:IIS-RequestFiltering /featureName:IIS-IPSecurity /featureName:IIS-Performance /featureName:IIS-HttpCompressionStatic /featureName:IIS-HttpCompressionDynamic /featureName:IIS-WebDAV /featureName:IIS-WebServerManagementTools /featureName:IIS-ManagementScriptingTools /featureName:IIS-ManagementService /featureName:IIS-IIS6ManagementCompatibility /featureName:IIS-Metabase /featureName:IIS-WMICompatibility /featureName:IIS-LegacyScripts /featureName:IIS-FTPServer /featureName:IIS-FTPSvc /featureName:IIS-FTPExtensibility /featureName:NetFx4Extended-ASPNET45 /featureName:IIS-ApplicationInit /featureName:IIS-WebSockets /featureName:IIS-CertProvider /featureName:IIS-ManagementConsole /featureName:IIS-LegacySnapIn /norestart
For easy deploymnet: Download the script.
Microsoft SQL Server
For information about supported SQL Server versions see Supported configurations
The installation of the SQL Server will be described in the following steps.
Installation Setup
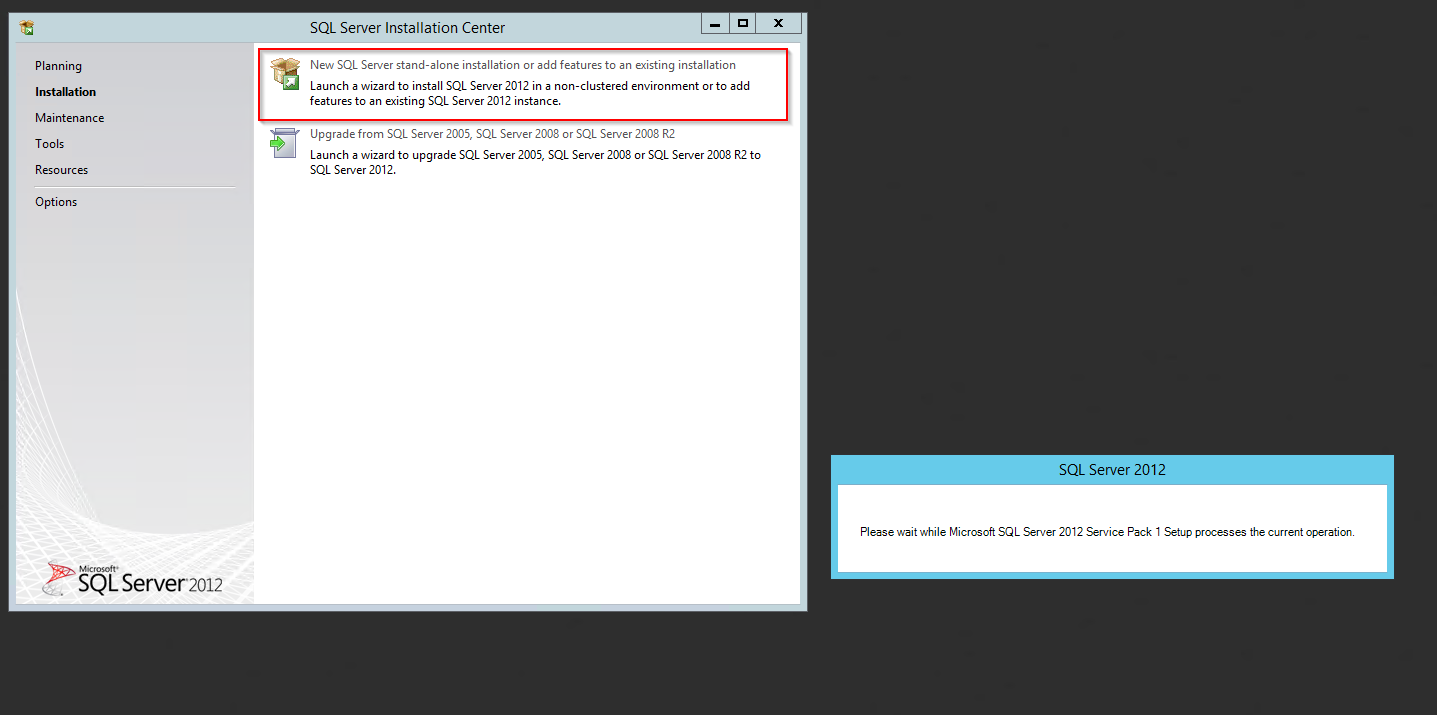
Start the SQL Server installation setup. Choose the “New SQL Server stand-alone installation…”-Option in the follwing Window:
Throughout the installation, please choose the same features as shown below:

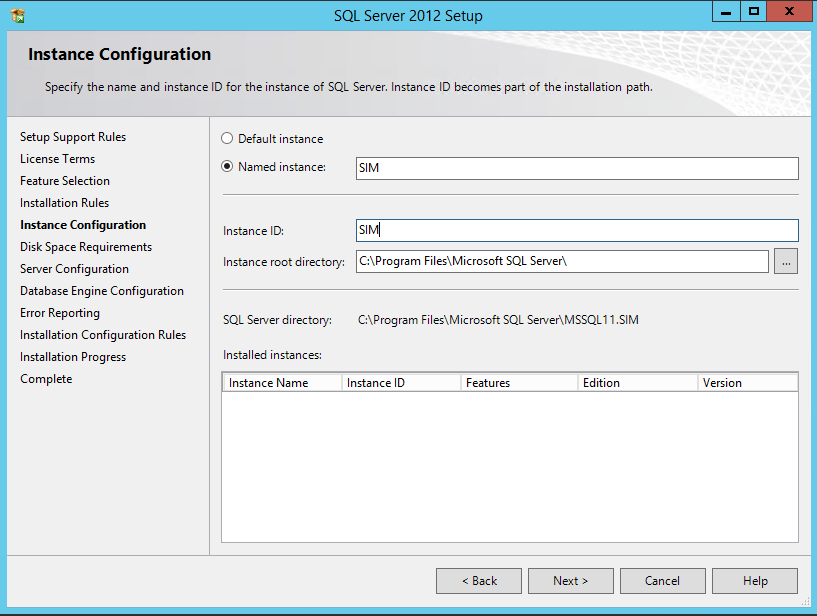
Name the instance SIM or choose another name:
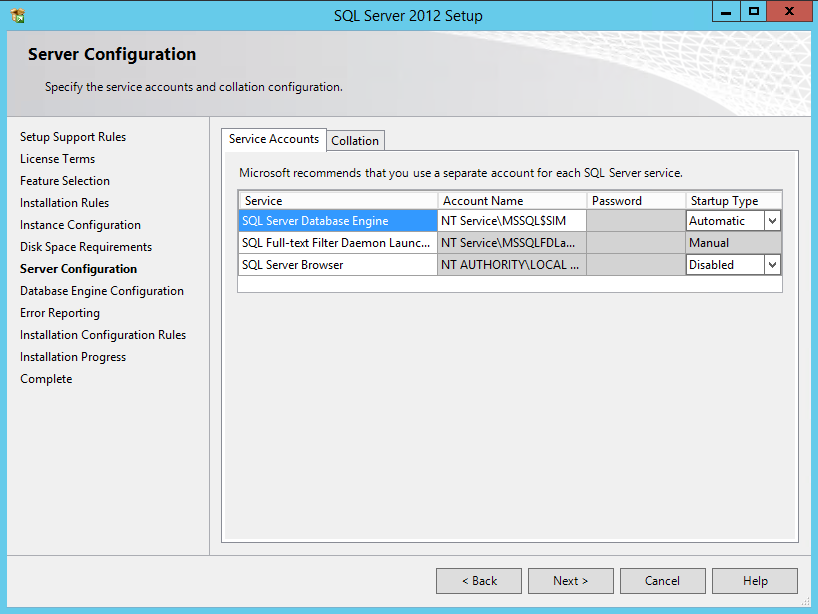
Configure the server as follows:
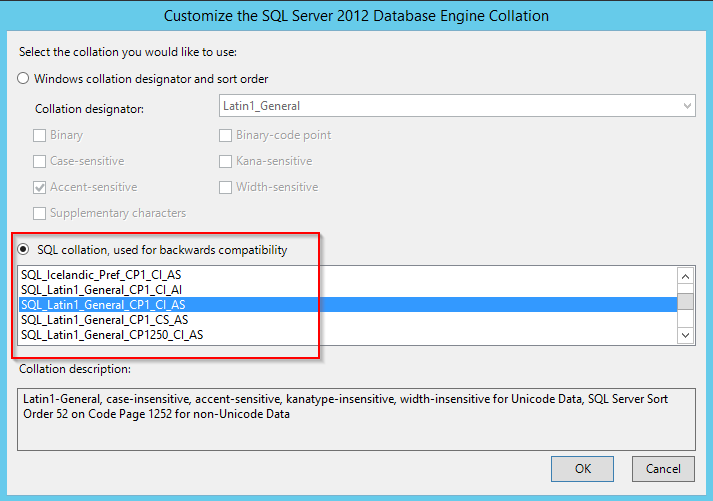
Customize the Database Engine
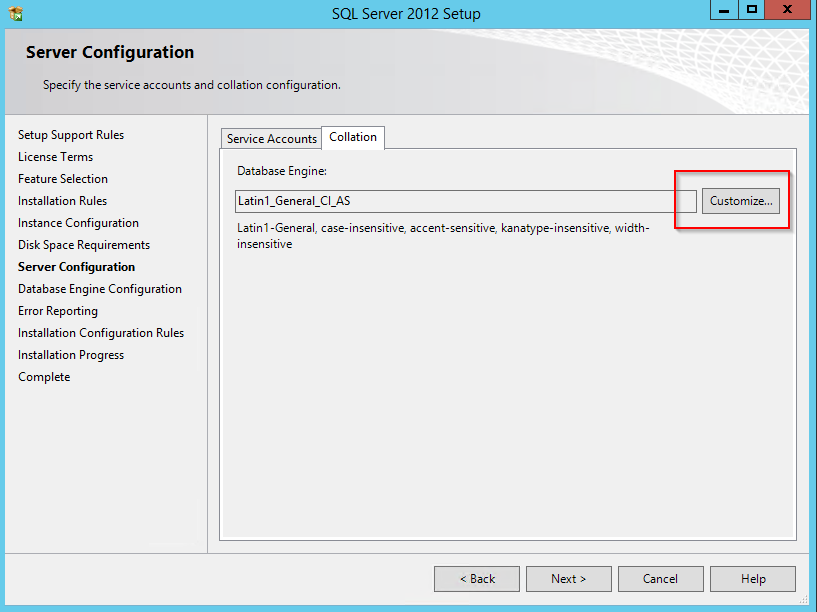
Choose the Database Engine called ‘SQL_Latin_General_CP1_CI_AS’:
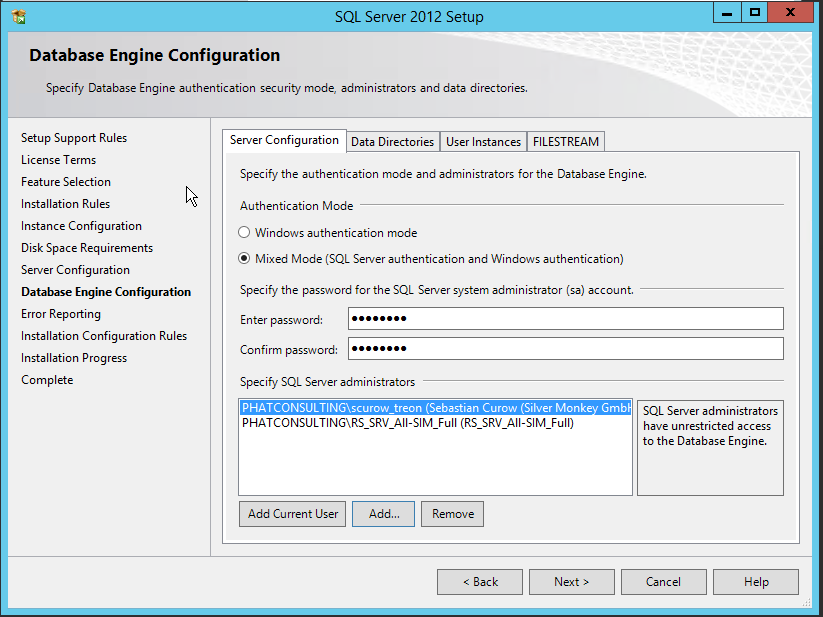
Select the ‘mixed mode’-authentification and add your AD service account for SQL (sim-svc-sql) as SQL Server administrator:
You have completed the setup!
SQL Server TCP/IP Configuration
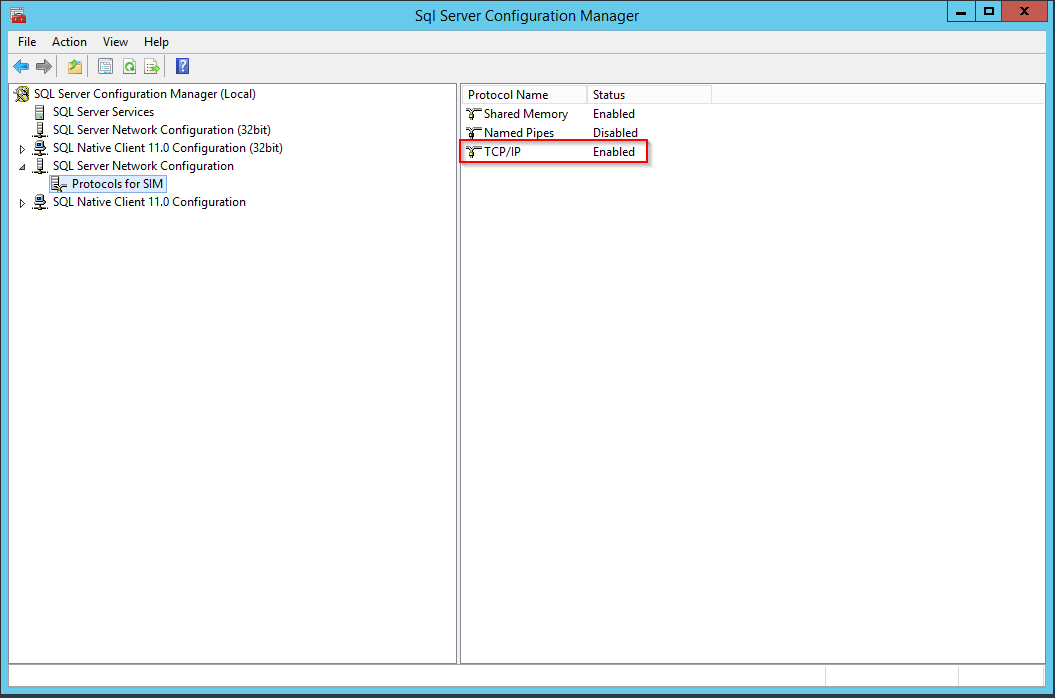
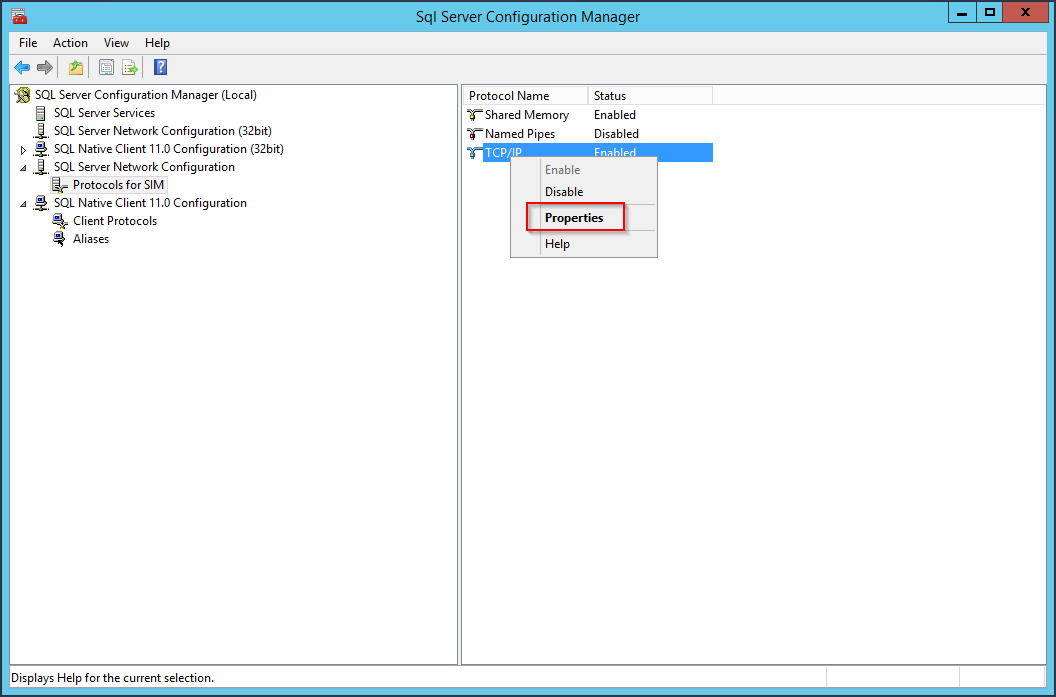
Open the SQL Server Configuration Manager, choose ‘SQL Server Network Configuration’ and then ‘Protocols for [Database Name]’. Change the TCP/IP Status to Enabled:
Right-click the TCP/IP line and choose ‘Properties’:
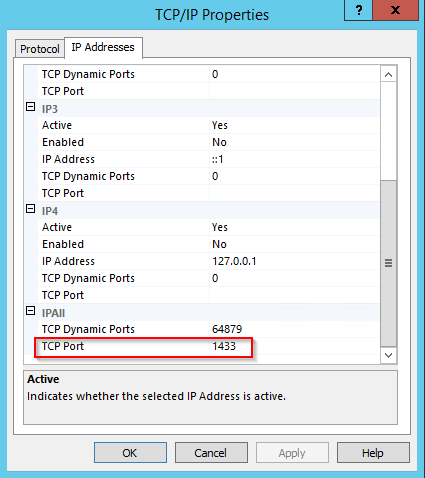
Choose the tab “IP Adresses” and change the ‘TCP Port’-entry to 1433:
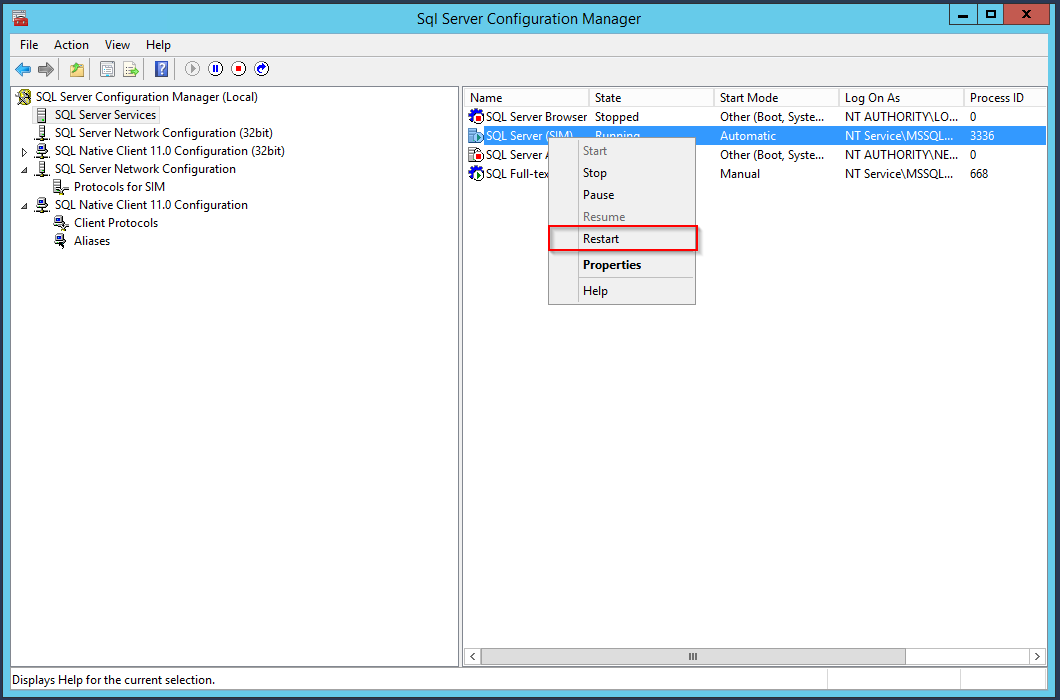
Afterwards, navigate to the SQL Server Services and restart the ‘SQL Server ([Database Name]):
SIM SQL DB Installation
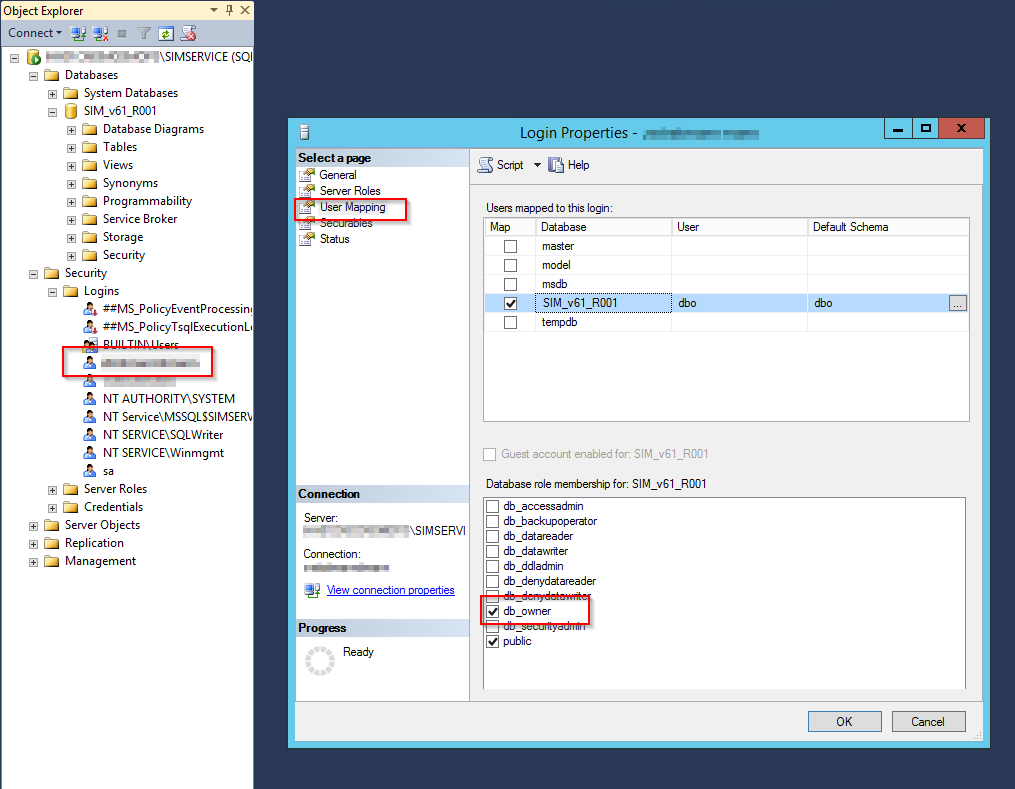
- Create database
SIM_v61_R001 - Grant SilverMonkey Service Account (
sim-svc-sql) “db_owner” rights for the corresponding database
- Import .SQL file from installation media (.\Database) into SQL Management Studio
- Make sure the USE command aims to the correct database created above and execute script
Configure IIS
Create IIS App Pool
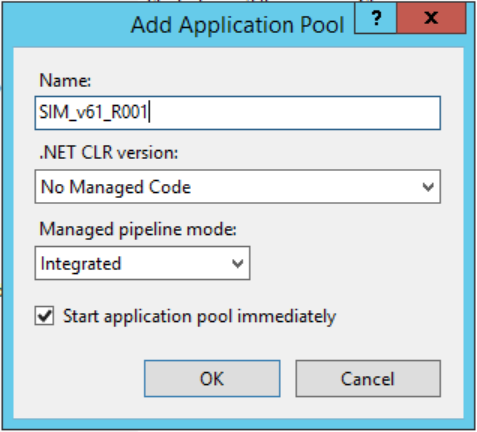
- Go to IIS Manager and create an AppPool with .NET CLR version set to
No Managed Code:
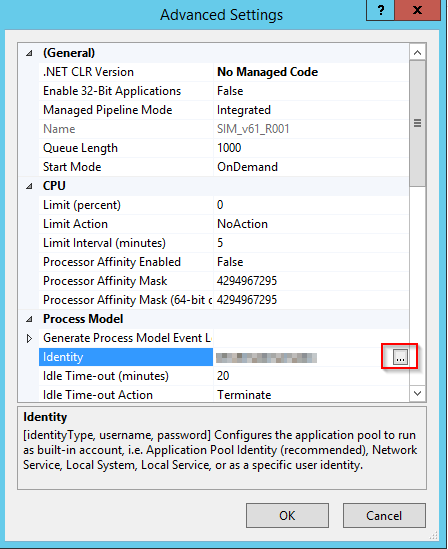
- Go into the Advanced Settings of this AppPool and change the
Process Model - Identity:
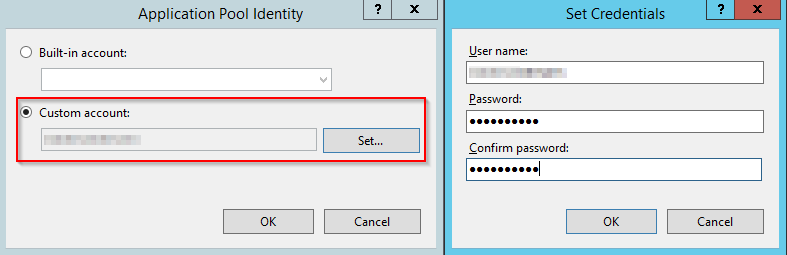
- Make sure to use a custom Active Directory user account, i.e. the Service Account (
sim-svc-sql) which has db_owner rights in the SIM v61 SQL database. This account is only used for accessing the own SQL database. Syntax:DOMAIN\UserName.
Create SilverMonkey folder
- Create C:\SilverMonkey
- Copy files from installation media
- Change connection string in file C:\SilverMonkey\v61\Config.xml (XPath: //Configuration/DBConnection)
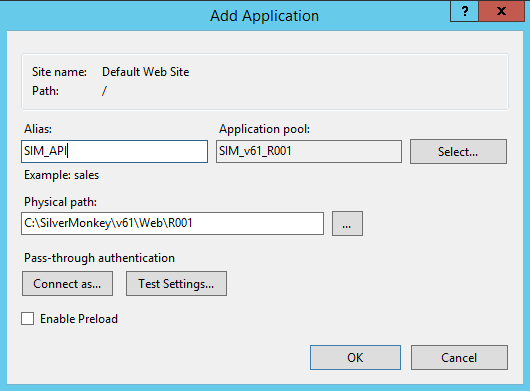
Create IIS Application
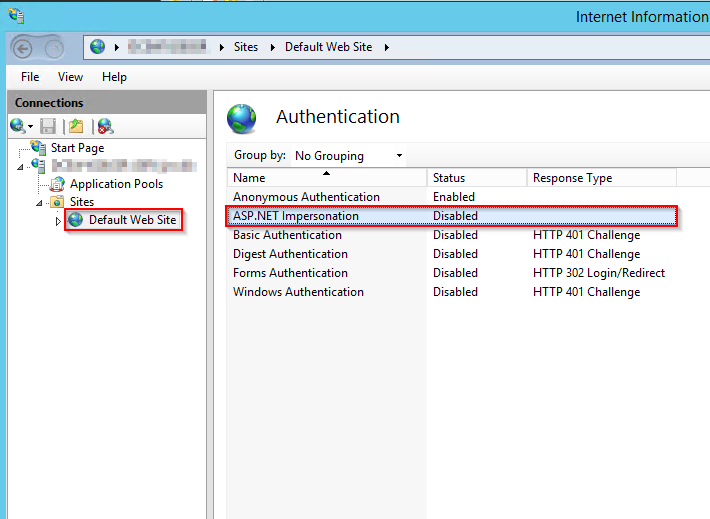
- Go to IIS Manager, DefaultWebSite (or other Website, make sure to disable Impersonation). Impersonation is not supported for v61 and must not be inherited from Default Website to IIS application.
- Add application, choose SIM AppPool (created above) and target to C:\SilverMonkey\Web\R001.
Hint
The alias defines the later URL: http://HOSTNAME/ALIAS
Install Windows Service
- Go to C:\SilverMonkey\v61\WinService
- Execute Install.cmd with administrative rights
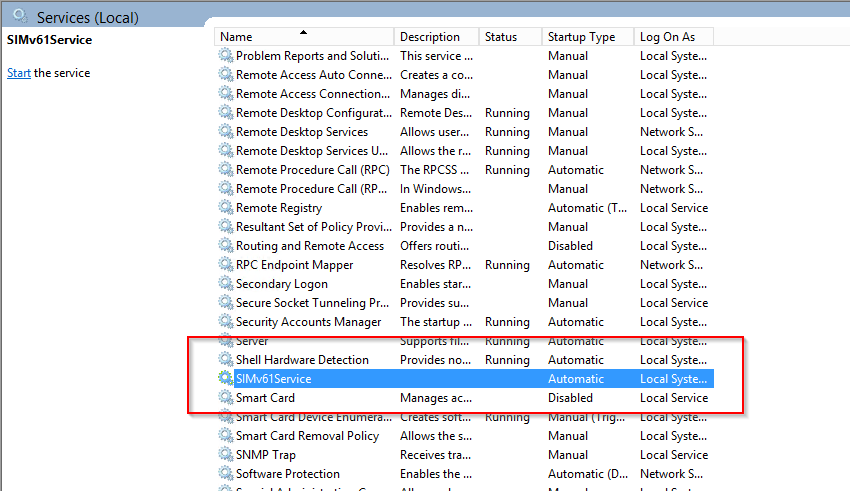
- Open services.msc and make sure that the Windows Service SIMv61Service is installed
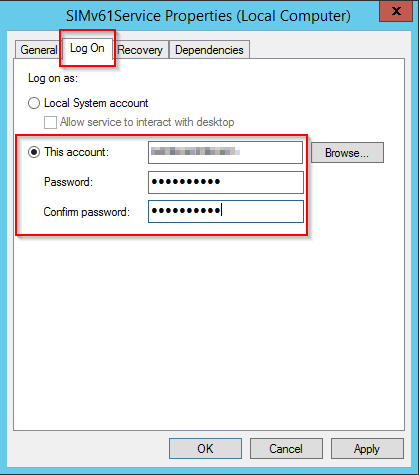
- Go into the properties of this service and change the Log On Account to the Service Account. This service account is used for the execution of every plugin run by the web service.
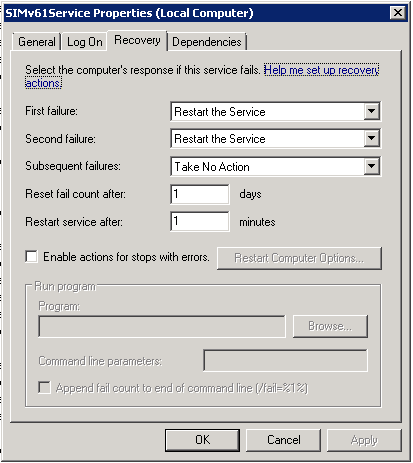
- To optimize failure tollerance, please configure “Recovery” tab like the following:
Test Installation
Note
For testing API download&install Postman: https://www.getpostman.com/apps
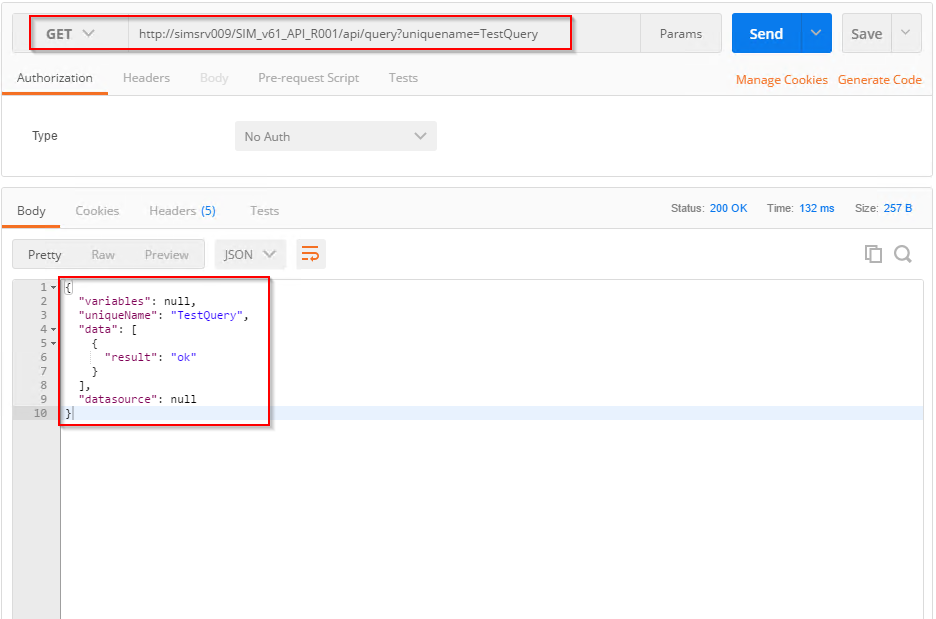
Test Query
Important
Try restarting the IIS Application/AppPool if you dont get the expected results!
- Start Postman
- Select GET as option
- Enter URL: http://SERVERNAME/APP_NAME/api/query?uniquename=TestQuery
- Hit execute
The following result should appear:
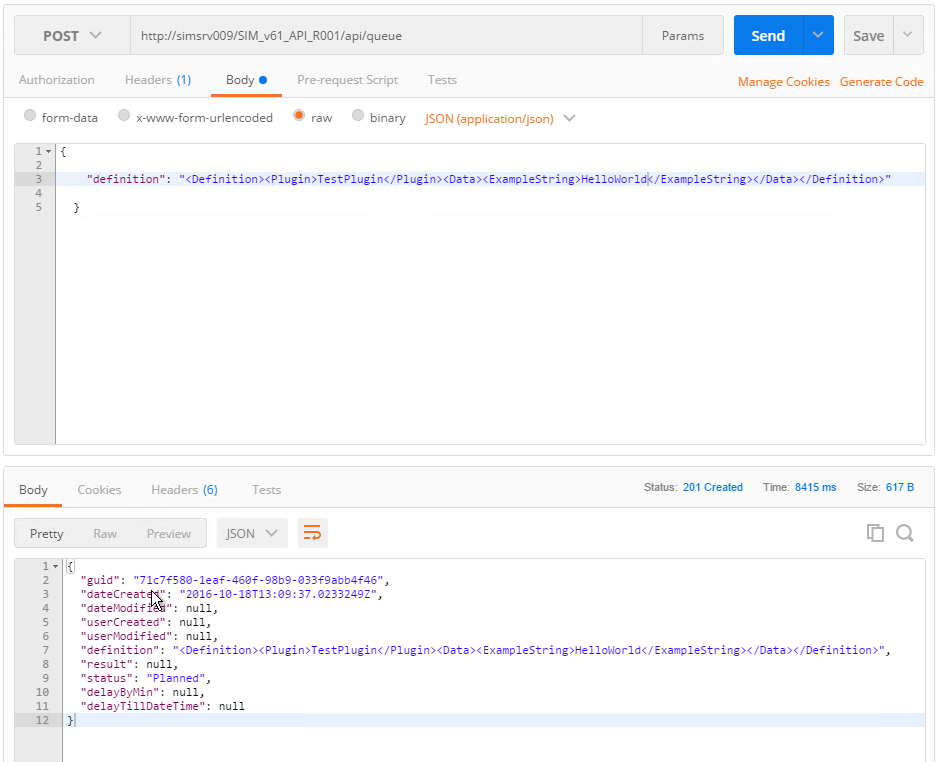
Test Queue
Important
Try restarting the IIS Application/AppPool if you dont get the expected results!
- Start Postman
- Select POST as option
- Enter URL: http://SERVERNAME/APP_NAME/api/Queue
- Add following code to body:
{"definition": "<Definition><Plugin>TestPlugin</Plugin><Data><ExampleString>HelloWorld</ExampleString></Data></Definition>"}
- Hit execute
The following result should appear:
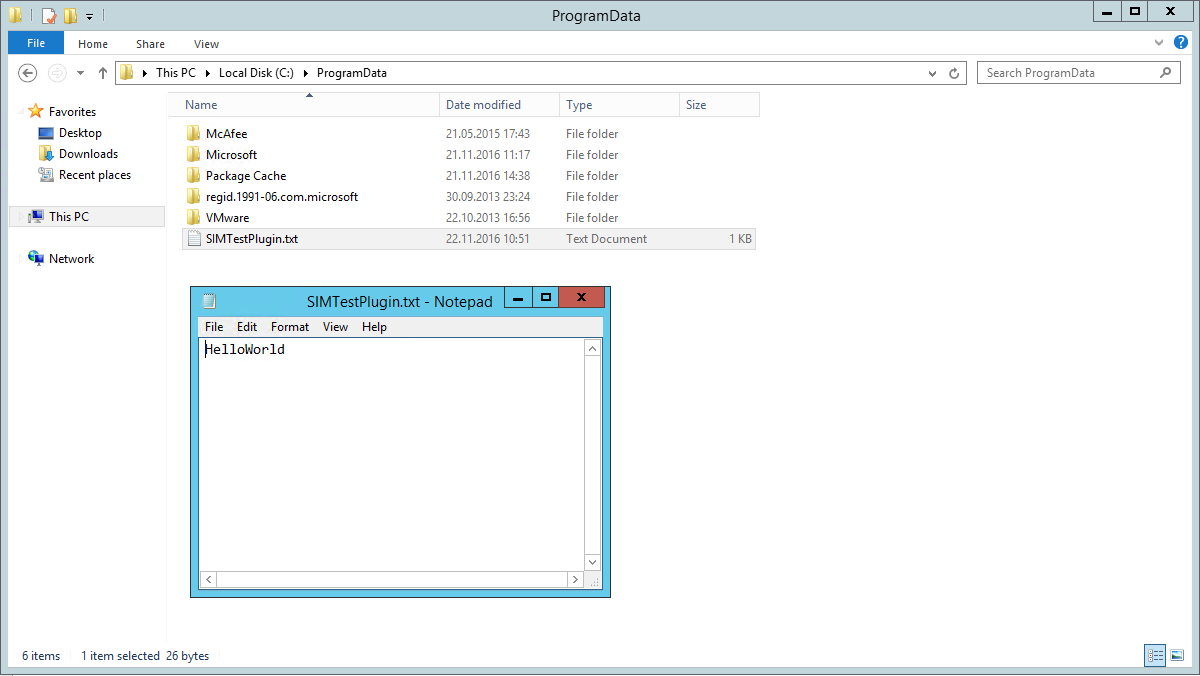
Note
For testing Queue use the Test Plugin and Check in C:Programmdata for the testfile